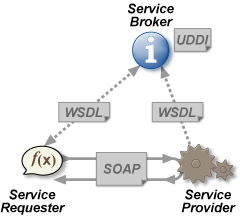
Webservice is some program interface, which uses SOAP protocol for communication. Using soap, you can communicate with any program, no matter on which language it is written.
What are Web Services?
Advantages and Disadvantages of Webservice:
http://social.msdn.microsoft.com/Forums/en-US/asmxandxml/thread/435f43a9-ee17-4700-8c9d-d9c3ba57b5ef
What is WSDL?
Provide Tomcat unzip location for Tomcat Installation directory and click Finish.
Apache Tomcat v6.0 should appear in Server Runtime Environments:

Project Name: WebServerClient and click Finish.
What are Web Services?
- Web services are application components
- Web services communicate using open protocols
- Web services are self-contained and self-describing
- Web services can be discovered using UDDI
- Web services can be used by other applications
- XML is the basis for Web services
Advantages and Disadvantages of Webservice:
http://social.msdn.microsoft.com/Forums/en-US/asmxandxml/thread/435f43a9-ee17-4700-8c9d-d9c3ba57b5ef
What is WSDL?
- WSDL is an XML-based language for locating and describing Web services.
- WSDL stands for Web Services Description Language
- WSDL is based on XML
- WSDL is used to describe Web services
- WSDL is used to locate Web services
- WSDL is a W3C standard
What is SOAP?
SOAP is an XML-based communication protocol and encoding format for inter-application communication. Originally conceived by Microsoft and Userland software, it has evolved through several generations; the current spec is version, SOAP 1.2, though version 1.1 is more widespread. The W3C's XML Protocol working group is in charge of the specification. SOAP is widely viewed as the backbone to a new generation of cross-platform cross-language distributed computing applications, termed Web Services.
Service Requester:
Service Requester can be considered as Client which request service.
Service Provider:
Service Provider can be considered as Server which provides service for the Client.
Creating Web Service in Eclipse:
Step 1:
Download Eclipse IDE from the following link and install it:
Step 2:
Download Tomcat Core zip from http://tomcat.apache.org/download-60.cgi and Unzip to some folder in your system.
Example Path: D:\Dump\apache-tomcat-6.0.36\apache-tomcat-6.0.36
Step 3:
Download Axis 2 from http://apache.techartifact.com/mirror//axis/axis2/java/core/1.6.2/axis2-1.6.2-bin.zip , unzip to some folder in your system:
Example Path: D:\Dump\axis2-1.6.2-bin\axis2-1.6.2
Step 4:
Start Eclipse and create Workspace:
Create Run Time for Tomcat server:
In Eclipse
Open Window -> Preferences -> Server -> Runtime Environments -> Click Add
Select Apache Tomcat v6.0 and click Next
Provide Tomcat unzip location for Tomcat Installation directory and click Finish.
Apache Tomcat v6.0 should appear in Server Runtime Environments:
Step 5: Creating a bottom up JAVA bean Web service and Web service client using Axis2 WTP Tools
Open Window -> Preferences -> Web Services -> Axis2 Preferences
provide axis 2 unzip path for Axis 2 Runtime Location(as shown in figure below):
Step 6:
In Eclipse File -> New -> Other -> Dynamic Web Project ->
Click Next
->Provide
Project name: WebServiceServer
Target Runtime: Apache Tomcat v6.0
Click Finish
Step 7:
WebServiceServer should appear in work space:
Open Java Resources -> Under Src create new java class and name it as RequestHandler.java
Under RequestHandler.java provide following Code:
package tdc.test.server;
import java.util.Date;
import java.text.SimpleDateFormat;
public class RequestHandler {
public String reverseYourName(String name){
return new StringBuffer(name).reverse().toString();
}
public String getCurrentDate(){
Date date=new Date();
SimpleDateFormat dateFormat=new SimpleDateFormat("dd-MMMM-yyyy h:mm a");
return dateFormat.format(date);
}
}
Figure:
Make sure that Class file got generate for this file.
Step 8:
Right click on RequestHandler.java and select Web services -> Create Web Service (As shown in figure below)
Step 9:
Select Server runtime as Tomcat v6.0 Server
web Server runtime as Apache Axis 2
as we have already configured those two run times. Click Finish
Step 10:
Following files need to be created.
Right Click on WebServiceServer -> Run As -> Run on Server after that click Finish.
Output: it should display following page:
Step 11:
Test if Web service server got created properly or not using following URL:
http://localhost:8080/WebServiceServer/services/RequestHandler?wsdl
Output: should display xml file format as shown in figure
Step 12: Now we are going to Create Client
For creating client we are going to create normal Java Project:
Step 13:
Copy Wsdl file from other project (WebServiceServer) and paste it inside src as shown in figure.
Step 14:
Right Click on RequestHandeler.wsdl file and select Webservice -> Generate Client
It should create following files as shown in image below:
Step 15:
Create a java class in Client Java Project (WebServerClient) with the name ServiceRequester.java:
Step 16:
Keep following code inside ServiceRequester.java which calls webservice we have created:
package tdc.test.client;
import java.rmi.RemoteException;
import javax.xml.rpc.ServiceException;
import tdc.test.server.RequestHandler;
import tdc.test.server.RequestHandlerServiceLocator;
public class ServiceRequester {
public static void main(String args[]) throws ServiceException,RemoteException{
RequestHandlerServiceLocator locator=new RequestHandlerServiceLocator();
RequestHandler requestor=locator.getRequestHandler();
String currentDate=requestor.getCurrentDate();
String reverseName=requestor.reverseYourName("Techdemocracy");
System.out.println("Current Date: "+currentDate);
System.out.println("Reverse Name: "+reverseName);
}
}
Image:
Run java Class ServiceRequester.java and see the ouput it will contact Server (Web Service) and displays output:
output:
Current Date and Reverse name provided..
Note: Before running java class make sure that Application server is running and following URL is working: http://localhost:8080/WebServiceServer/services/RequestHandler?wsdl
Thanks !!!!


