Pages

Friday, November 30, 2012

OAM 11g R2 Lab 7: Change Oracle Logos in Login page and Console or Customize OAM Console

To change Oracle Logo in Login page and inside Admin Console following changes need to be made.

Login Page Logo Change: 

For Login page Oracle logo is in background image. So to change that we need to change Modify Background image(login_logo.png)

We need to modify login_logo.png under two locations: (Following are the locations under windows)


Location 1: D:\Oracle_New\Middleware\user_projects\domains\base_domain\servers\oam_server1\tmp\_WL_user\oam_server_11.1.2.0.0\dcyk8m\war\pages\images

Location 2: D:\Oracle_New\Middleware\user_projects\domains\base_domain\servers\AdminServer\tmp\_WL_user\oam_admin_11.1.2.0.0\7po8nl\war\images

Steps: 

1) Take backup of already existing image (login_logo.png) and rename it(login_logo - Copy.png).


Original Login Page background image: 


Modified Login page background image: (name it as login_logo.png)


Restart the server and try the url localhost:7001/oamconsole/ then you should see now login page

Admin Console Logo change: 


We need to change following css file:

File Location:(In Windows)  D:\Oracle_New\Middleware\user_projects\domains\base_domain\servers\AdminServer\tmp\_WL_user\oam_admin_11.1.2.0.0\7po8nl\public\adf\styles\cache

css file: fusion-desktop-hyko18-en-ltr-gecko-cmp.css

Change background image url with relative/specific or path only for logo-oracle-red.png

Original: background-image:url(logo-oracle-red.png);

I replaced it with google logo :) :

Changed: background-image:url(http://www.soft-go.com/blog/wp-content/uploads/2007/11/google_logo_small.jpg);


Restart both admin server and OAM Server and check logo after login.

Thanks !!!

Create Certificate Using Open SSL, PKCS12, CA Root Signature

Download Windows Version of OpenSSL From 

http://sourceforge.net/projects/gnuwin32/files/openssl/0.9.8h-1/openssl-0.9.8h-1-setup.exe/download?use_mirror=nchc

For Linux Open SSL use following path:

http://www.openssl.org/source/

1) Install Open SSL

2) After installation browse to OpenSSL location path (In windows C:\Program Files (x86)\GnuWin32\bin)

3) Open same path in Command Prompt.

4) Generate RSA Private Key using following command.

cmd> openssl genrsa -out iamidm.key 4096 -des3

Following Output should appear after running the command:


Loading 'screen' into random state - done Generating RSA private key, 4096 bit long modulus
...++
......................................................................................................++e is 65537 (0x10001)

Key should get created with the name iamidm.key in the location where you are running command. 

5) Generate Root Certificate using following Command:

cmd>openssl req -new -config "C:\Program Files (x86)\GnuWin32\share\openssl.cnf" -x509 -days 365 -key iamidm.key -out iamidm.crt

OUTPUT:

Loading 'screen' into random state - done
You are about to be asked to enter information that will be incorporated
into your certificate request.
What you are about to enter is what is called a Distinguished Name or a DN.
There are quite a few fields but you can leave some blank
For some fields there will be a default value,
If you enter '.', the field will be left blank.
-----
Country Name (2 letter code) [AU]:IN
State or Province Name (full name) [Some-State]:ANDHRA
Locality Name (eg, city) []:HYDERABAD
Organization Name (eg, company) [Internet Widgits Pty Ltd]:IAMIDM
Organizational Unit Name (eg, section) []:IAM
Common Name (eg, YOUR name) []:RAVITEJA
Email Address []:CHINNIRAVIEJA@GMAIL.COM


Certificate will be generated with 1 year validity(as we have given 365 days) and with the name iamidm.crt


6) Create Subordinate CA that is used for signature.

Generate another RSA Key.


cmd>openssl genrsa -out iamidm_sub.key 4096 -des3

output:
Loading 'screen' into random state - done
Generating RSA private key, 4096 bit long modulus
...............................................................................................................................++
.............................++
e is 65537 (0x10001)


Check output file that would have generate with the name iamidm_sub.key


Generate another certificate using above key :

cmd> openssl req -new -config "C:\Program Files (x86)\GnuWin32\share\openssl.cnf"  -key iamidm_sub.key -out iamidm_sub.csr

7) Generate Certificate now:


cmd>openssl x509 -req -days 365 -in iamidm_sub.csr -CA iamidm.crt -CAkey iamidm.key -set_serial 01 -out server.crt


OUTPUT:

Loading 'screen' into random state - done
Signature ok
subject=/C=IN/ST=ANDHRA/L=HYD/O=IAMIDM_SUB/OU=IAM/CN=RAVI/emailAddress=CHINNIRAV
ITEJA@GMAIL.COM
Getting CA Private Key


Now server.crt should get generated.

Package the keys and certs in a pkcs12 file


cmd>openssl pkcs12 -export -out iamidm_sub.p12 inkey iamidm_sub.key -in server.crt -chain -CAfile iamidm.crt

Loading 'screen' into random state - done

Enter Export Password:
Verifying - Enter Export Password:


iamidm_sub.p12 will get generated. 

Thanks !!

OHS Reverse Proxy for Weblogic with out SSL

In Windows:

  • Go to path where mod_wl_ohs.conf location. (Example path in windows: D:\Oracle_New\Middleware\Oracle_WT1\instances\instance1\config\OHS\ohs_new)

Update the parameters as follows: (Remove all # codes as they are comments)

<IfModule weblogic_module>
      WebLogicHost weblogic hostname
      WebLogicPort weblogic port
      Debug ON
      WLLogFile /tmp/weblogic.log
      MatchExpression *.jsp
</IfModule>


<Location /console>
      SetHandler weblogic-handler
      PathTrim /console
      PathPrepend /console
      ErrorPage  http://www.myweblogic.com:7001/noconsolepage.html
</Location>
  • Restart OHS Server using opmnctl.bat/opmnctl.sh (in linux) (Path in windows: D:\Oracle_New\Middleware\Oracle_WT1\instances\instance1\bin)

Restart Commands: (go to above path and use following commands)

1) opmnctl.bat stopall

2) opmnctl.bat startall

3) opmnctl.bat status (check Status)

Try the url: localhost:7777/console and weblogic console should be displayed. :) 


Thanks !!! 

Wednesday, November 28, 2012

OAM 11G R2 Lab 6: Webgate for IIS 7.x in 32 Bit Windows

IIS Server need following webgate

64 Bit Components:(if 64bit)

Oracle_Access_Manager10_1_4_3_0_Win64_ISAPI_WebGate.exe

32 Bit Components: 

Oracle_Access_Manager10_1_4_3_0_Win32_ISAPI_WebPass
Oracle_Access_Manager10_1_4_3_0_Win32_ISAPI_Policy_Manager
Oracle_Access_Manager10_1_4_3_0_Win32_ISAPI_WebGate

Webpass and Policy Manager required for old versions of OAM.

Go to Path: C:\Windows\System32\inetsrv\config, take backup of applicationHost.config file and remove  from the file and save it. 

Add IIS6 Management Compatibility under Management Tools under Add Service Role for IIS Server in Server Manager.

Run Installer Oracle_Access_Manager10_1_4_3_0_Win32_ISAPI_WebGate and

->select path where to install while installing.

-> Select Mode of Security.

-> Provide Webgate id and other details and make sure that your access manager server is running.


WebGate ID: Agent name which is already created in OAM console.
Password for WebGate: Any Password
Access Server ID: Any Name
Host Name: Host name of access server.
Port Number: OAM proxy-port, default value 5575 .(Can be checked in proxy of OAMConsole-> System Configuration -> Server Instance)


For Proceed with Automatic update of IIS Configuration select Yes.

Click Next, Next and Finish.

Note: Open IIS Server Manger and click on ISAPI Filter and Point OracleWebgate to correct path C:\Program Files\NetPoint\Webgate\access\oblix\apps\webgate\bin\webgate.dll

Restart IIS Server and try accessing any URL.

Unprotect/Remove Webgate temporarily for iis: If you want to unprotect just remove isapi filter pointing to webgate.dll which makes it unprotected/Webgate dont work for IIS.

Thanks !!!

Tuesday, November 6, 2012

Basic Web services and Building sample Web service in Eclipse (Java)

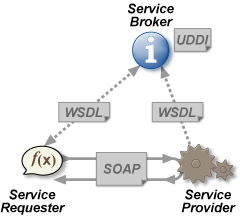
Webservice is some program interface, which uses SOAP protocol for communication. Using soap, you can communicate with any program, no matter on which language it is written.

What are Web Services?


  • Web services are application components
  • Web services communicate using open protocols
  • Web services are self-contained and self-describing
  • Web services can be discovered using UDDI
  • Web services can be used by other applications
  • XML is the basis for Web services


Advantages and Disadvantages of Webservice:

http://social.msdn.microsoft.com/Forums/en-US/asmxandxml/thread/435f43a9-ee17-4700-8c9d-d9c3ba57b5ef


What is WSDL?
  • WSDL is an XML-based language for locating and describing Web services.
  • WSDL stands for Web Services Description Language
  • WSDL is based on XML
  • WSDL is used to describe Web services
  • WSDL is used to locate Web services
  • WSDL is a W3C standard
What is SOAP?

SOAP is an XML-based communication protocol and encoding format for inter-application communication. Originally conceived by Microsoft and Userland software, it has evolved through several generations; the current spec is version, SOAP 1.2, though version 1.1 is more widespread. The W3C's XML Protocol working group is in charge of the specification. SOAP is widely viewed as the backbone to a new generation of cross-platform cross-language distributed computing applications, termed Web Services.


Service Requester:
 
Service Requester can be considered as Client which request service.

Service Provider: 

Service Provider can be considered as Server which provides service for the Client. 

Creating Web Service in Eclipse: 

Step 1: 

Download Eclipse IDE from the following link and install it: 


Step 2: 

Download Tomcat Core zip from http://tomcat.apache.org/download-60.cgi and Unzip to some folder in your system.

Example Path: D:\Dump\apache-tomcat-6.0.36\apache-tomcat-6.0.36

Step 3: 

Download Axis 2 from http://apache.techartifact.com/mirror//axis/axis2/java/core/1.6.2/axis2-1.6.2-bin.zip , unzip to some folder in your system: 

Example Path: D:\Dump\axis2-1.6.2-bin\axis2-1.6.2

Step 4: 

Start Eclipse and create Workspace: 

Create Run Time for Tomcat server: 

In Eclipse

Open Window -> Preferences -> Server -> Runtime Environments -> Click Add

Select Apache Tomcat v6.0 and click Next

 Provide Tomcat unzip location for Tomcat Installation directory and click Finish.


Apache Tomcat v6.0 should appear in Server Runtime Environments:


Step 5: Creating a bottom up JAVA bean Web service and Web service client using Axis2 WTP Tools 

Open Window -> Preferences -> Web Services -> Axis2 Preferences

provide axis 2 unzip path for Axis 2 Runtime Location(as shown in figure below): 


Step 6: 

In Eclipse File -> New -> Other -> Dynamic Web Project -> 


Click Next

->Provide 

Project name: WebServiceServer

Target Runtime: Apache Tomcat v6.0


Click Finish

Step 7: 

WebServiceServer should appear in work space:


Open Java Resources -> Under Src create new java class and name it as RequestHandler.java


Under RequestHandler.java provide following Code: 

package tdc.test.server;

import java.util.Date;
import java.text.SimpleDateFormat;

public class RequestHandler {

public String reverseYourName(String name){
return new StringBuffer(name).reverse().toString();
}
public String getCurrentDate(){
Date date=new Date();
SimpleDateFormat dateFormat=new SimpleDateFormat("dd-MMMM-yyyy h:mm a");
return dateFormat.format(date);
}
}

Figure: 


Make sure that Class file got generate for this file.

Step 8: 

Right click on RequestHandler.java and select Web services -> Create Web Service (As shown in figure below) 


Step 9: 

Select Server runtime as Tomcat v6.0 Server

web Server runtime as Apache Axis 2

as we have already configured those two run times. Click Finish


Step 10: 

Following files need to be created. 

Right Click on WebServiceServer -> Run As -> Run on Server after that click Finish. 


Output: it should display following page: 


Step 11: 

Test if Web service server got created properly or not using following URL: 

http://localhost:8080/WebServiceServer/services/RequestHandler?wsdl

Output: should display xml file format as shown in figure


Step 12: Now we are going to Create Client

For creating client we are going to create normal Java Project:


 Project Name: WebServerClient and click Finish.


Step 13: 

Copy Wsdl file from other project (WebServiceServer) and paste it inside src as shown in figure. 


Step 14: 
Right Click on RequestHandeler.wsdl file and select Webservice -> Generate Client


It should create following files as shown in image below: 


Step 15: 

Create a java class in Client Java Project (WebServerClient) with the name ServiceRequester.java


Step 16:

Keep following code inside ServiceRequester.java which calls webservice we have created: 

package tdc.test.client;

import java.rmi.RemoteException;
import javax.xml.rpc.ServiceException;
import tdc.test.server.RequestHandler;
import tdc.test.server.RequestHandlerServiceLocator;


public class ServiceRequester {

public static void main(String args[]) throws ServiceException,RemoteException{
RequestHandlerServiceLocator locator=new RequestHandlerServiceLocator();
RequestHandler requestor=locator.getRequestHandler();
String currentDate=requestor.getCurrentDate();
String reverseName=requestor.reverseYourName("Techdemocracy");
System.out.println("Current Date: "+currentDate);
System.out.println("Reverse Name: "+reverseName);
}
}

Image: 


Run java Class ServiceRequester.java and see the ouput it will contact Server (Web Service) and displays output: 

output: 

Current Date and Reverse name provided..


Note: Before running java class make sure that Application server is running and following URL is working: http://localhost:8080/WebServiceServer/services/RequestHandler?wsdl


Thanks !!!! 

Wednesday, October 31, 2012

OAM 11G R2 Lab 5: Session Management in OAM Console

Session Management is manage sessions for users logged in.

Login to OAMConsole, localhost:7001/oamconsole.

1) Go to System Configuration -> Session Management

2) Open Session Management as shown in the figure 

3) Provide the search details of user id or client IP Address and click search


4) If you want to delete any session select one session and click on delete icon (Cross button with red color).

5) When ever user login, user session will get created. If admin deletes any user session from session manager then user will be throws to login page

Thanks !!! 

OAM 11g R2 Lab4: Protecting secure URL and Configuring Logout URL

1) Create Sample HTML Page

Code:


2) Place it in OHS Htdocs path:

D:\Oracle\Middleware\Oracle_WT1\instances\instance1\config\OHS\ohs1\htdocs

Htdocs is like root folder for OHS, we can directly access page as localhost:7777/secure.html


3) In our previous lab we have already protected users under 7777/*

http://www.iamidm.com/2012/10/oim-11g-r2-lab-3-webgate-instance.html

4) If you want to confirm with policy login to OAMConsole and verify Resources under Application Domain, below image shows /** is protected Resource.


5) If we observer the code we have configured to go to logout2.html if user clicks on Logout.


6) To make any page as logoutpage we need to make changes in Agent configuration.

go to System Configuration -> Access Manager -> SSOAgents -> OAM Agents -> Open your Agent

7) Add your logout page urls to Logout URL.


8) Access secure URL: localhost:7777/secure.html, you should be redirected to OAM login page and after login you will shown secure.html.


9) Click on Logout and see it should be redirected to login page after logout.


Thanks !!!

Tuesday, October 30, 2012

OAM 11G R2 Lab 3: Webgate Instance Creation and Registration (OHS server)

Webgate Instance Creation:

1) Start Admin server and OAM Managed server.

2) Go to following path: D:\Oracle\Middleware\Oracle_OAMWebGate1\webgate\ohs\tools\deployWebGate


3)  Webgate Instance creation help.

deployWebGateInstance.bat --help


"Usage  : deployWebGateInstance -w -oh "

4) Run the following command: deployWebGateInstance.bat -w D:\Oracle\Middleware\Oracle_WT1\instances\instance1\config\OHS\ohs1 -oh D:\Oracle\Middleware\Oracle_OAMWebGate1


OUTPUT: (Which copies files to OAM instance)

Copying files
D:\Oracle\Middleware\Oracle_OAMWebGate1\webgate\ohs\config\oblog_config_wg.xml
1 File(s) copied
D:\Oracle\Middleware\Oracle_OAMWebGate1\webgate\ohs\tools\openssl\simpleCA\cacert.pem
1 File(s) copied
D:\Oracle\Middleware\Oracle_OAMWebGate1\webgate\ohs\tools\openssl\simpleCA\cakey.pem
1 File(s) copied

5) Webgate Registration:
To edit httpd config file we have tool in Webgate installation:
 D:\Oracle\Middleware\Oracle_OAMWebGate1\webgate\ohs\tools\EditHttpConf

6) To get help for EditHttpConf use following command:

EditHttpConf.exe --help

Output:

usage: EditHttpConf -w [-oh ] [-o
tput_file> ]


7) To generate new webgate.conf file run above command in following manner:


D:\Oracle\Middleware\Oracle_OAMWebGate1\webgate\ohs\tools\EditHttpConf>EditHttpConf.exe -w D:\Oracle\Middleware\Oracle_WT1\instances\instance1\config\OHS\ohs1 -oh D:\Oracle\Middleware\Oracle_OAMWebGate1 -o webgate.conf

Output:
The web server configuration file was successfully updated

D:\Oracle\Middleware\Oracle_WT1\instances\instance1\config\OHS\ohs1/httpd.conf h
as been backed up as D:\Oracle\Middleware\Oracle_WT1\instances\instance1\config\
OHS\ohs1/httpd.conf.ORIG

which creates back up for already existing httpd.conf file and creates new httpd file with configuration in webtier instance.

8) Modify take back up of OAM11GRequest.xml file and modify as shown in below image with required URL.


9) Run:

D:\Oracle\Middleware\Oracle_IDM1\oam\server\rreg>.\bin\oamreg.bat inband input\O
AM11GRequest.xml


Output:
OAM_REG_HOME=D:\Oracle\Middleware\Oracle_IDM1\oam\server\rreg\bin\..
CLASSPATH=D:\Oracle\Middleware\Oracle_IDM1\oam\server\rreg\bin\..\lib\rreg.jar;D
:\Oracle\Middleware\Oracle_IDM1\oam\server\rreg\bin\..\lib;D:\Oracle\Middleware\
Oracle_IDM1\oam\server\rreg\bin\..\lib\RequestResponse.jar;D:\Oracle\Middleware\
Oracle_IDM1\oam\server\rreg\bin\..\lib\commons-codec-1.3.jar;D:\Oracle\Middlewar
e\Oracle_IDM1\oam\server\rreg\bin\..\lib\commons-httpclient-3.1.jar;D:\Oracle\Mi
ddleware\Oracle_IDM1\oam\server\rreg\bin\..\lib\commons-logging-1.1.1.jar;D:\Ora
cle\Middleware\Oracle_IDM1\oam\server\rreg\bin\..\lib\ojmisc.jar;D:\Oracle\Middl
eware\Oracle_IDM1\oam\server\rreg\bin\..\lib\jps-api.jar;D:\Oracle\Middleware\Or
acle_IDM1\oam\server\rreg\bin\..\lib\jps-internal.jar;D:\Oracle\Middleware\Oracl
e_IDM1\oam\server\rreg\bin\..\lib\jps-common.jar;D:\Oracle\Middleware\Oracle_IDM
1\oam\server\rreg\bin\..\lib\identitystore.jar;D:\Oracle\Middleware\Oracle_IDM1\
oam\server\rreg\bin\..\lib\identityutils.jar;D:\Oracle\Middleware\Oracle_IDM1\oa
m\server\rreg\bin\..\lib\ldapjclnt11.jar;D:\Oracle\Middleware\Oracle_IDM1\oam\se
rver\rreg\bin\..\lib\dms.jar;D:\Oracle\Middleware\Oracle_IDM1\oam\server\rreg\bi
n\..\lib\fmw_audit.jar;D:\Oracle\Middleware\Oracle_IDM1\oam\server\rreg\bin\..\l
ib\ojdl.jar;D:\Oracle\Middleware\Oracle_IDM1\oam\server\rreg\bin\..\lib\oraclepk
i.jar;D:\Oracle\Middleware\Oracle_IDM1\oam\server\rreg\bin\..\lib\osdt_cert.jar;
D:\Oracle\Middleware\Oracle_IDM1\oam\server\rreg\bin\..\lib\osdt_core.jar;D:\Ora
cle\Middleware\Oracle_IDM1\oam\server\rreg\bin\..\lib\osdt_jce.jar;D:\Oracle\Mid
dleware\Oracle_IDM1\oam\server\rreg\bin\..\lib\osdt_saml.jar;D:\Oracle\Middlewar
e\Oracle_IDM1\oam\server\rreg\bin\..\lib\osdt_xmlsec.jar;D:\Oracle\Middleware\Or
acle_IDM1\oam\server\rreg\bin\..\lib\xmlparserv2.jar;D:\Oracle\Middleware\Oracle
_IDM1\oam\server\rreg\bin\..\lib\jps-unsupported-api.jar;D:\Oracle\Middleware\Or
acle_IDM1\oam\server\rreg\bin\..\lib\nap-api.jar;D:\Oracle\Middleware\Oracle_IDM
1\oam\server\rreg\bin\..\lib\utilities.jar;D:\Oracle\Middleware\Oracle_IDM1\oam\
server\rreg\bin\..\lib\jps-ee.jar;D:\Oracle\Middleware\Oracle_IDM1\oam\server\rr
eg\bin\..\lib\rreg.jar;D:\Oracle\Middleware\Oracle_IDM1\oam\server\rreg\bin\..\l
ib;D:\Oracle\Middleware\Oracle_IDM1\oam\server\rreg\bin\..\lib\RequestResponse.j
ar;D:\Oracle\Middleware\Oracle_IDM1\oam\server\rreg\bin\..\lib\commons-codec-1.3
.jar;D:\Oracle\Middleware\Oracle_IDM1\oam\server\rreg\bin\..\lib\commons-httpcli
ent-3.1.jar;D:\Oracle\Middleware\Oracle_IDM1\oam\server\rreg\bin\..\lib\commons-
logging-1.1.1.jar;D:\Oracle\Middleware\Oracle_IDM1\oam\server\rreg\bin\..\lib\oj
misc.jar;D:\Oracle\Middleware\Oracle_IDM1\oam\server\rreg\bin\..\lib\jps-api.jar
;D:\Oracle\Middleware\Oracle_IDM1\oam\server\rreg\bin\..\lib\jps-internal.jar;D:
\Oracle\Middleware\Oracle_IDM1\oam\server\rreg\bin\..\lib\jps-common.jar;D:\Orac
le\Middleware\Oracle_IDM1\oam\server\rreg\bin\..\lib\identitystore.jar;D:\Oracle
\Middleware\Oracle_IDM1\oam\server\rreg\bin\..\lib\identityutils.jar;D:\Oracle\M
iddleware\Oracle_IDM1\oam\server\rreg\bin\..\lib\ldapjclnt11.jar;D:\Oracle\Middl
eware\Oracle_IDM1\oam\server\rreg\bin\..\lib\dms.jar;D:\Oracle\Middleware\Oracle
_IDM1\oam\server\rreg\bin\..\lib\fmw_audit.jar;D:\Oracle\Middleware\Oracle_IDM1\
oam\server\rreg\bin\..\lib\ojdl.jar;D:\Oracle\Middleware\Oracle_IDM1\oam\server\
rreg\bin\..\lib\oraclepki.jar;D:\Oracle\Middleware\Oracle_IDM1\oam\server\rreg\b
in\..\lib\osdt_cert.jar;D:\Oracle\Middleware\Oracle_IDM1\oam\server\rreg\bin\..\
lib\osdt_core.jar;D:\Oracle\Middleware\Oracle_IDM1\oam\server\rreg\bin\..\lib\os
dt_jce.jar;D:\Oracle\Middleware\Oracle_IDM1\oam\server\rreg\bin\..\lib\osdt_saml
.jar;D:\Oracle\Middleware\Oracle_IDM1\oam\server\rreg\bin\..\lib\osdt_xmlsec.jar
;D:\Oracle\Middleware\Oracle_IDM1\oam\server\rreg\bin\..\lib\xmlparserv2.jar;D:\
Oracle\Middleware\Oracle_IDM1\oam\server\rreg\bin\..\lib\jps-unsupported-api.jar
;D:\Oracle\Middleware\Oracle_IDM1\oam\server\rreg\bin\..\lib\nap-api.jar;D:\Orac
le\Middleware\Oracle_IDM1\oam\server\rreg\bin\..\lib\utilities.jar;D:\Oracle\Mid
dleware\Oracle_IDM1\oam\server\rreg\bin\..\lib\jps-ee.jar;D:\Oracle\Middleware\O
racle_IDM1\oam\server\rreg\bin\..\lib\rreg.jar;D:\Oracle\Middleware\Oracle_IDM1\
oam\server\rreg\bin\..\lib;D:\Oracle\Middleware\Oracle_IDM1\oam\server\rreg\bin\
..\lib\RequestResponse.jar;D:\Oracle\Middleware\Oracle_IDM1\oam\server\rreg\bin\
..\lib\commons-codec-1.3.jar;D:\Oracle\Middleware\Oracle_IDM1\oam\server\rreg\bi
n\..\lib\commons-httpclient-3.1.jar;D:\Oracle\Middleware\Oracle_IDM1\oam\server\
rreg\bin\..\lib\commons-logging-1.1.1.jar;D:\Oracle\Middleware\Oracle_IDM1\oam\s
erver\rreg\bin\..\lib\ojmisc.jar;D:\Oracle\Middleware\Oracle_IDM1\oam\server\rre
g\bin\..\lib\jps-api.jar;D:\Oracle\Middleware\Oracle_IDM1\oam\server\rreg\bin\..
\lib\jps-internal.jar;D:\Oracle\Middleware\Oracle_IDM1\oam\server\rreg\bin\..\li
b\jps-common.jar;D:\Oracle\Middleware\Oracle_IDM1\oam\server\rreg\bin\..\lib\ide
ntitystore.jar;D:\Oracle\Middleware\Oracle_IDM1\oam\server\rreg\bin\..\lib\ident
ityutils.jar;D:\Oracle\Middleware\Oracle_IDM1\oam\server\rreg\bin\..\lib\ldapjcl
nt11.jar;D:\Oracle\Middleware\Oracle_IDM1\oam\server\rreg\bin\..\lib\dms.jar;D:\
Oracle\Middleware\Oracle_IDM1\oam\server\rreg\bin\..\lib\fmw_audit.jar;D:\Oracle
\Middleware\Oracle_IDM1\oam\server\rreg\bin\..\lib\ojdl.jar;D:\Oracle\Middleware
\Oracle_IDM1\oam\server\rreg\bin\..\lib\oraclepki.jar;D:\Oracle\Middleware\Oracl
e_IDM1\oam\server\rreg\bin\..\lib\osdt_cert.jar;D:\Oracle\Middleware\Oracle_IDM1
\oam\server\rreg\bin\..\lib\osdt_core.jar;D:\Oracle\Middleware\Oracle_IDM1\oam\s
erver\rreg\bin\..\lib\osdt_jce.jar;D:\Oracle\Middleware\Oracle_IDM1\oam\server\r
reg\bin\..\lib\osdt_saml.jar;D:\Oracle\Middleware\Oracle_IDM1\oam\server\rreg\bi
n\..\lib\osdt_xmlsec.jar;D:\Oracle\Middleware\Oracle_IDM1\oam\server\rreg\bin\..
\lib\xmlparserv2.jar;D:\Oracle\Middleware\Oracle_IDM1\oam\server\rreg\bin\..\lib
\jps-unsupported-api.jar;D:\Oracle\Middleware\Oracle_IDM1\oam\server\rreg\bin\..
\lib\nap-api.jar;D:\Oracle\Middleware\Oracle_IDM1\oam\server\rreg\bin\..\lib\uti
lities.jar;D:\Oracle\Middleware\Oracle_IDM1\oam\server\rreg\bin\..\lib\jps-ee.ja
r;D:\Oracle\Middleware\Oracle_IDM1\oam\server\rreg\bin\..\lib\rreg.jar;D:\Oracle
\Middleware\Oracle_IDM1\oam\server\rreg\bin\..\lib;D:\Oracle\Middleware\Oracle_I
DM1\oam\server\rreg\bin\..\lib\RequestResponse.jar;D:\Oracle\Middleware\Oracle_I
DM1\oam\server\rreg\bin\..\lib\commons-codec-1.3.jar;D:\Oracle\Middleware\Oracle
_IDM1\oam\server\rreg\bin\..\lib\commons-httpclient-3.1.jar;D:\Oracle\Middleware
\Oracle_IDM1\oam\server\rreg\bin\..\lib\commons-logging-1.1.1.jar;D:\Oracle\Midd
leware\Oracle_IDM1\oam\server\rreg\bin\..\lib\ojmisc.jar;D:\Oracle\Middleware\Or
acle_IDM1\oam\server\rreg\bin\..\lib\jps-api.jar;D:\Oracle\Middleware\Oracle_IDM
1\oam\server\rreg\bin\..\lib\jps-internal.jar;D:\Oracle\Middleware\Oracle_IDM1\o
am\server\rreg\bin\..\lib\jps-common.jar;D:\Oracle\Middleware\Oracle_IDM1\oam\se
rver\rreg\bin\..\lib\identitystore.jar;D:\Oracle\Middleware\Oracle_IDM1\oam\serv
er\rreg\bin\..\lib\identityutils.jar;D:\Oracle\Middleware\Oracle_IDM1\oam\server
\rreg\bin\..\lib\ldapjclnt11.jar;D:\Oracle\Middleware\Oracle_IDM1\oam\server\rre
g\bin\..\lib\dms.jar;D:\Oracle\Middleware\Oracle_IDM1\oam\server\rreg\bin\..\lib
\fmw_audit.jar;D:\Oracle\Middleware\Oracle_IDM1\oam\server\rreg\bin\..\lib\ojdl.
jar;D:\Oracle\Middleware\Oracle_IDM1\oam\server\rreg\bin\..\lib\oraclepki.jar;D:
\Oracle\Middleware\Oracle_IDM1\oam\server\rreg\bin\..\lib\osdt_cert.jar;D:\Oracl
e\Middleware\Oracle_IDM1\oam\server\rreg\bin\..\lib\osdt_core.jar;D:\Oracle\Midd
leware\Oracle_IDM1\oam\server\rreg\bin\..\lib\osdt_jce.jar;D:\Oracle\Middleware\
Oracle_IDM1\oam\server\rreg\bin\..\lib\osdt_saml.jar;D:\Oracle\Middleware\Oracle
_IDM1\oam\server\rreg\bin\..\lib\osdt_xmlsec.jar;D:\Oracle\Middleware\Oracle_IDM
1\oam\server\rreg\bin\..\lib\xmlparserv2.jar;D:\Oracle\Middleware\Oracle_IDM1\oa
m\server\rreg\bin\..\lib\jps-unsupported-api.jar;D:\Oracle\Middleware\Oracle_IDM
1\oam\server\rreg\bin\..\lib\nap-api.jar;D:\Oracle\Middleware\Oracle_IDM1\oam\se
rver\rreg\bin\..\lib\utilities.jar;D:\Oracle\Middleware\Oracle_IDM1\oam\server\r
reg\bin\..\lib\jps-ee.jar;
------------------------------------------------
Welcome to OAM Remote Registration Tool!
Parameters passed to the registration tool are:
Mode: inband
Filename: D:\Oracle\Middleware\Oracle_IDM1\oam\server\rreg\bin\..\input\OAM11GRe
quest.xml
Enter admin username:weblogic
Username: weblogic
Enter admin password:
Do you want to enter a Webgate password?(y/n):
n
Do you want to import an URIs file?(y/n):
n

----------------------------------------
Request summary:
OAM11G Agent Name:RREG_OAM11G
Base URL:http://localhost:7777
URL String:RREG_HostId11G
Registering in Mode:inband
Your registration request is being sent to the Admin server at: http://localhost
:7001
----------------------------------------


Oct 30, 2012 7:15:56 PM oracle.security.jps.util.JpsUtil disableAudit
INFO: JpsUtil: isAuditDisabled set to true
Inband registration process completed successfully! Output artifacts are created
 in the output folder.


10) copy cwallet.sso, ObAccessClient.xml from D:\Oracle\Middleware\Oracle_IDM1\oam\server\rreg\output\RREG_OAM11G to D:\Oracle\Middleware\Oracle_WT1\instances\instance1\config\OHS\ohs1\webgate\config


11) Restart OHS instances.

12) Check if domain got created or not in OAM console.

13) check the url which you have protected: (localhost:7777)

Thanks!!!

Monday, October 29, 2012

Webtier Status, Stop and Start

Webtier is required for Webgate. 

To stop Webtier process: opmnctl.bat stopall 


To start Webtier process: opmnctl.bat startall


To verify the status of Webtier: opmnctl.bat status


To know more help on opmnctl : opmnctl.bat --help

Thanks !!!

OAM 11g R2 Lab 2: Webgate installation.

WebGate installation and Configuration.

1) Download Webgate(ofm_oam_webgates_generic_11.1.1.3.0_disk1_1of1) from Oracle Edelivery.

2) Before starting webgate installation we need to have webtier installed.

3) Download webtier(ofm_webtier_win_11.1.1.6.0_64_disk1_1of1) from following link.

http://www.oracle.com/technetwork/java/webtier/downloads/index2-303202.html

4) Make sure that weblogic was installed and Admin server was started as it required during Webtier installation.

5) After webtier installation start Webgate installation by running setup file in Disk 1 through command prompt.

6) Webgate requires oracle middleware path and remaining steps are very straight forward.

Thanks !!!

Tuesday, October 23, 2012

OAM 11G R2 LAB1: DataSource Creation for AD

In this LAB we are going to see how to create DataSource (User Store) for AD in OAM 11G R2.

1) Login to OAM Console (Example: http://localhost:7001/oamconsole)


2)  Go to System Configuration


3) Click on User Identity Store and select new as shown below. 

4) Should receive empty form as shown below. 


5) Fill in Details as shown below. If you need to provide multiple AD servers separate by space or line (Location) and what ever user name attribute is given it should have some value filled in AD(Atleast for one user) 


6) Click on Test Connection and verify if connection is successfully or not. 


7) Click Apply. 


Thanks !!! 

Monday, October 22, 2012

Embedded LDAP in Weblogic

Today we are going to see embedded LDAP in weblogic.
  • Login to Weblogic console.


  • Click on Security Realm

  • Select the Realm

  • Click on Users and Groups: Which contains weblogic Users and Groups. 


  • If you need to create new user click on new and provide values. To view Groups click on Groups tab and edit as required. 

Embedded LDAP can maximum accommodate up-to 10K users, if it is more than that we need to go for other user store. Embedded LDAP is Default Data Source for OAM. 

Thanks !!!