Pages

Wednesday, June 26, 2013

Error CFGFWK-60850 and CFGFWK-60853 and Solution

Following errors may occur while creating domain for SOA.

SQL Test=select 1 from schema_version_registry where owner=(select user from dual) and mr_type='SOAINFRA' and version like '11.1.1.7.0';

CFGFWK-60850: Test Failed!

CFGFWK-60853:A connection was established to database but no rows were returned from the test SQL Statement. 

SQL Test=select 1 from schema_version_registry where owner=(select user from dual) and mr_type='SOASDPM' and version like '11.1.1.7.0';

CFGFWK-60850: Test Failed!

CFGFWK-60853:A connection was established to database but no rows were returned from the test SQL Statement. 

SQL Test=select 1 from schema_version_registry where owner=(select user from dual) and mr_type='MDS' and version like '11.1.1.7.0';

CFGFWK-60850: Test Failed!

CFGFWK-60853:A connection was established to database but no rows were returned from the test SQL Statement. 


Solution: 

First check SOA Schema version in Database by connecting to Database using sys account using the query:

select owner, comp_name, version, status from schema_version_registry order by 1, 2, 3;

Refer: http://www.iamidm.com/2013/06/rcu-schema-versions.html

check if you have schema version '11.1.1.7.0' or not.

If you have different version then you need to use another RCU, for 11.1.1.7.0 you need to use RCU version 11.1.1.7 and with OIM 11g R2 PS1 you get SOA version 11.1.1.6 so SOA 11.1.1.7 is not comparable with OIM 11g R2 PS1.


Thanks !!!

RCU Schema Versions

This post is to check version of SOA


  • Login to Database as sys as sysdba


  • Check RCU Schema Versions using query: 


select owner, comp_name, version, status from schema_version_registry order by 1, 2, 3;

Output: 

In this you can verify all the schema that got created and also version.

Inline image 1


Monday, June 24, 2013

Error in Invoking target install of make file during Installation

Error:

Error in Invoking target 'install' of make file /sqlplus/lib/ins_sqlplus.mk 

see log for details

Solution: 

This error occurs due to missing libraries mainly in Linux (OEL 6.4 or less). To over come this error install rpm  glibc-devel-2.3.4-2.19.i386.rpm using the command as root.

rpm -i glibc-devel-2.3.4-2.19.i386.rpm --nodeps –force

Once RPM got installed you need to verify following file exists or not: 

crt1.o under /usr/lib if it exists then stop current installation and remove temporary files and current files created during this installation and start installation again. 

Thanks !!!

Change OraInventory Location during Oracle Products Installation

In few cases we need to change orainventory location for that we need to do following steps:

Method 1: 
  • First Check the location: 

[root@ ~]#  cat /etc/oraInst.loc

inventory_loc=/opt/oracle/oraInventory
inst_group=iamidm

  • Change location and group. 

[root@ ~]# vi oraInst.loc

inventory_loc=/idmaccess/oraInventory
inst_group=iamidm_new


  • Copy folder orainventory from old location to new location and reinstall. 
Method 2: 

Directly remove file /etc/oraInst.loc and oraInventory folder then it will ask again to re-enter orainventory location. 

Thanks !!!

Saturday, June 15, 2013

JDK 8 Download and installation

JDK 8 Installation on windows
Download jdk from:
Installation Steps:
Click Next


Check java version and other details from Java Control Panel

Check java Version:


Java Runtime Environment Settings: 


Thanks !!!

Friday, June 14, 2013

slamd 2.0.1 load generation engine server Installation and Configuration

SLAMD is an open-source tool which has been widely used for benckmarking and performance analysis for directory servers. By default the installable comes with Tomcat. you can deploy the war file if you have an existing web server in your environment.

Below steps will explain on how to setup the default version which comes with Tomcat.

Installation and Configuration steps:

1. Download the installable from http://dl.thezonemanager.com/slamd/ or http://fossies.org/linux/privat/slamd-2.0.1.zip/  it is just a zip distribution.

2. Unzip the file and Navigate to C:\Users\veeru\Desktop\slamd\tools

3. Open "set-java-home.bat" and configure JAVA_HOME here. Remember that this tool expects to define    the JAVA_HOME up till the java.exe. For example if your java.exe is located at "C:\Oracle\jdk1.6.0_43\bin" , then edit the file "set-java-home.bat"  as shown below


4. Once you have JAVA_HOME setup, Navigate to bin folder and launch "startup.bat"
     
    a pop-up command line will be launched as shown below. 


5. Open a browser and hit http://localhost:8080/slamd/ you will see a screen like this


6. The first time the SLAMD administrative interface is accessed, it will be necessary to initialize the database used to store the configuration and job data. This may be accomplished by clicking the "Create Database" button as may be seen below:


7. You will see a confirmation like this.

8. Tool is now setup and ready to use.

We will look at configuring schedule jobs and monitoring in the upcoming posts.

Thanks,
Veeru Yads


Thursday, June 6, 2013

OAG 11.1.2.1.0 Policy Studio Basics

In this post, we will explore some options available in OAG Policy Studio like How to connect to Node Manager, Connect to an OAG Instance etc.

Steps:
  • Launch Policy Studio
  • Ensure that Node Manager is running. Click on "Connect to Server"


  • Click on "Connect to Server" and provide the appropriate host, port information of your Node Manager


  • Not sure why it asked for a passphrase, No need to give anything here. Just click OK


  • Ensure that the instance you want to connect is up and running.


  • Observe that the instance "APIGateway1" which was created during installation has been listed here. You can create new groups and instances through Policy Studio
  • Double click on the instance"APIGateway1" to connect and open the session 


  • Connection has been established to the Instance. now you can perform all the operations.


Thanks
Veeru Yads

OAG 11.1.2.1.0 start / stop commands

My previous post cover the installation steps for OAG. Now its time to start and play around with OAG's components like

  • Node Manager
  • Instances that were created
  • Policy Studio
  • oaganalytics components (if at all configured and being used)


Start Node Manager:

Navigate to C:\Oracle\OAG-11.1.2.1.0\apigateway\Win32\bin and double click on "nodemanager.bat"


Start Instance:

Navigate to C:\Oracle\OAG-11.1.2.1.0\apigateway\Win32\bin and run the below command

  > startinstance -n "APIGateway1" -g "APIGroup1"

Here, APIGateway1 and APIGroup1 are the instance name and group name that i have defined during installation.


On windows, if you have configured to have the instance listed as a Windows service during installation, you can go to services and start the same.


Start Policy Studio:

Navigate to C:\Oracle\OAG-11.1.2.1.0\oagpolicystudio and run "policystudio.exe"
you will get a console like this


we will talk about some configurations using Policy Studio in the next post.

Thanks,
Veeru Yads

OAG 11.1.2.1.0 Installation


Oracle API Gateway (formerly Oracle Enterprise Gateway)  provides DMZ-class security and a comprehensive threat defense system at the service perimeter to Mobile and Cloud environments, thus providing critical protection needed between un-trusted and trusted zones. It secures APIs used and secures web service and SOA implementations. 

Installation:

Download the installable from here and follow the below step-by-step procedure to install OAG on your server. This is an easy and straight forward install. Make sure the ports that you want to configure are open and available to use and files/folders have the admin rights. you are good to go

Steps:

  • Navigate to C:\softwares\oim_11gR2\OAG-11.1.2.1.0 and run "OAG-11.1.2.1.0-windows-installer.exe" as administrator


  • Pick the location where you want to install it


Thats it.. OAG has been installed and ready to use :)

Browser can be launched by URL https://veeru-lab.veeru.com:8090/

username: admin
password: changeme (this is the default password provided)


Thanks,
Veeru Yads

Reference:
http://docs.oracle.com/cd/E39820_01/doc.11121/gateway_install_docs/content/install_gateway.html


Wednesday, June 5, 2013

Java Code: PrePopulate Adapter to populater User ID from OIM form

Prepopulate Adapter: Pre-populate Adapater to populate User ID from OIM form using Java:


Create Jar with below code and place it in lib folder:


Zip lib folder and plugin.xml:


Prepop Code:


Plugin.xml

Part 1 : Application testing automation using Selenium IDE

This post is the first one of the series on using Selenium IDE for unit testing.

In a typical production OAM environment, we will have so many URLs which were protected by OAM. In some cases of prod breakdowns/changes, we will end up testing all the websites login with a test account and make sure the required page has been displayed after successful authentication and authorization.

Tools like Sitescope, CA wily etc are available in the market to verify the application availability periodically. However if you think of an Open source solution, I am not sure if we have any tools available for free which can be used to configure the applications and monitor them closely.

In this post, I would like to explore Selenium IDE tool and see if it fit my needs.

Selenium IDE is a Firefox plugin that does record-and-playback of interactions with the browser. Use this to either create simple scripts, assist in exploratory testing

Requirement: Let's say my environment has 100 websites, There is an unexpected outage and all servers were restarted. I would like to test all these 100 websites and make sure of the below

  1. Site is up and running
  2. Authentication and Authorization is successful
  3. Expected page has been served by the App/web sever after successful Authentication and    Authorization
I would like to use Selenium IDE Tool to achieve this in lesser time and minimal manual effort.

Selenium IDE Plug-in Installation:

Selenium is from the house of Mozilla. it can downloaded from http://docs.seleniumhq.org/download/ This plug-in can be found in Mozilla Firefox add-ons too

You can either download the IDE from the website and install it or launch a Firefox browser and search for selenium add-ons and add them,

Once you install the plug-in, you can launch the IDE by navigating to Tools > Selenium IDE
or just click ctrl + alt + s

you will get a new window like this. Refer to Selenium documentation to get tips on how to use the tool. Plenty of videos on YouTube as well. :)


We will talk about  test case creation and automation in my next post.

Thanks,
Veeru Yads


Tuesday, June 4, 2013

OAM 11g R2 Server and Agent Monitoring

In this post, we will discuss on the OOTB Monitoring provided for OAM server instance and webgates.

OAM Server Monitoring:

Follow the below steps to navigate to the monitoring console.

1. Start the weblogic and OAM server
2. Login to OAM Admin console
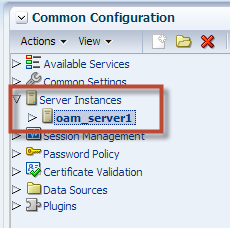
3. Navigate to "Common Configuration" > "Server Instances"


4. Pick the server instance you want to monitor and go to Actions > Monitor menu


5. Here is the Monitoring console with 4 tabs


6. In the "Session Operations" tab, you can view the below parameters by selecting the respective columns to be displayed.


7. Similarly you can view Authentication related parameters in the "Server Operations" tab as shown below


8. Under OAM Agents, it will list all the web gates that were connected to the OAM server and using it


9. Notice that "Agent_OAM10gIISWebGate" was the 10g webgate that i installed and configured on IIS. thi s is not OOTB. all the webgates in your environment will be listed here with status and version info.


Webgate Monitoring:

Follow the below steps to navigate to the monitoring console.

1. Login to OAM Admin console
2. Navigate to "Access Manager" > "OAM Agents"
3. Search for the webgates and pick the one you want to monitor


4. Click on Actions > Monitor


5. Below screenshots will show the 4 tabs that were available for webgate monitoring.


Thanks,
Veeru Yads