Configuring Oracle Internet Directory and Oracle Virtual Directory
Step 1) Run config.sh from $ORACLE_HOME/bin
Step 2) Click Next
Step 3) Specify password for weblogic user and specify Domain Name and click Next
Step 4) Browse "Weblogic server directory"and also specify "Oracle Instance Name"
Step 5) Act as per business requirements
Step 6) Select below check box and click Next
1)OID- Oracle Internet Directory
2)OVD - Oracle Virtual Directory
3)DIP - Oracle Directory Integration Platform
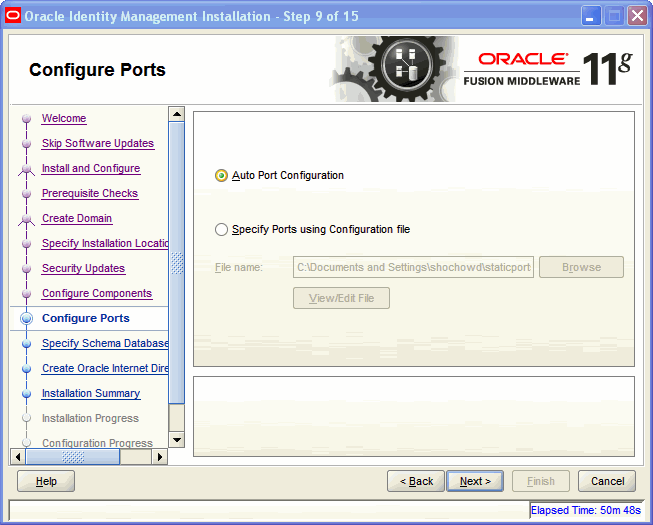
Step 7)Select radio button Auto Port Configuration and click Next

Note:
-->Select Auto Port Configuration if you want the Installer to configure ports from a predetermined range.
-->Select Specify Ports using Configuration File if you want the Installer to configure ports using the staticports.ini file. You can click View/Edit File to update the settings in the staticports.ini file.
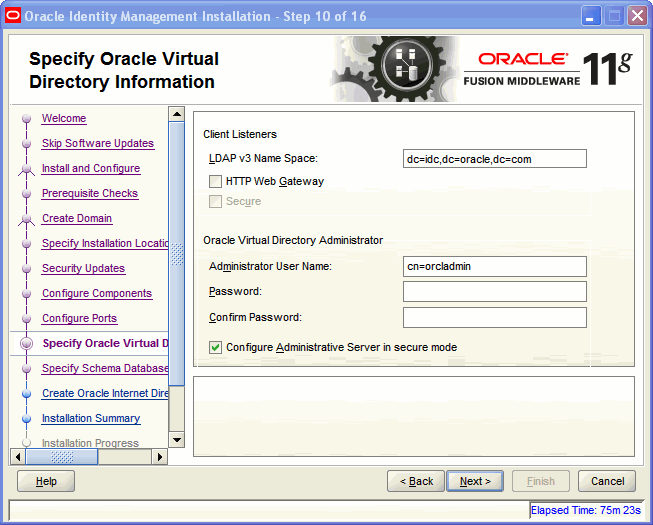
Step 8) Enter LDAP details and password for "orcladmin" user.
Uncheck "Configure Administrative server in secure mode"checkbox.

Note:
LDAP v3 Name Space: Enter the name space for Oracle Virtual Directory. The default value is dc=myhost,dc=mycompany,dc=com.
HTTP Web Gateway: Select this option to enable the Oracle Virtual Directory HTTP Web Gateway.
Secure: Select this option if you enabled the HTTP Web Gateway and you want to secure it using SSL.
Administrator User Name: Enter the user name for the Oracle Virtual Directory administrator. The default value is cn=orcladmin.
Password: Enter the password for the Oracle Virtual Directory administrator.
Confirm Password: Enter the password for the Oracle Virtual Directory administrator again.
Configure Administrative Server in secure mode: Select this option to secure the Oracle Virtual Directory Administrative Listener using SSL. This option is selected by default. Oracle recommends selecting this option.
Step 9) Connect String : http://DBHostname:DBPort/DBInstanceName
Schema Name: ODS
Password: Password for ODS schema created at time of RCU
Step 10) Enter Realm and password for "orcladmin" user
Step 11)Click Configure
Step 12) Check Next once the configuration has been completed for all components.
Step 13) Click Finish